Introduction to Web Services and REST

I’m back with a new series of tutorials! This series of posts aims to discuss web services (specifically REST). I am in no-part an expert nor do I claim to be. Feel free to reach contact me for any errors or feedback (krisviceral at gmail).

Web services are becoming more and more popular in the past few years. Why wouldn’t it be? As the past few years have showed, people have more than a few computing devices with them at any one time. No longer are people limited to desktops and laptops when they want to check their email, Facebook, etc. With that in mind, people expect different things this day and age. People expect to be able to check all these things on a series of devices from tablets to smartphones to even refrigerators.  Web services helps application developers distribute their product or content on a variety of different platforms. How? Web service decouples the data to the application. Different applications can consume the same data from a standard source.

What is a Web Service?

Wikipedia states that a “web service” is a method of communication between 2 devices over the web. Services can be accessed over a web or net address and are typically always-on. With that definition, we can grab the key terms to defining a web service are “communication”, “net address” and “always-on”.

The communication aspect of a web service means that one device is the producer (service) and the other is the requester (client). The information passed can be an XML a JSON (JavaScript Object Notation) or a media type depending on the type of web service implementation. Net address means that the service can be accessed through (you got it!) a web URL. Unlike a web application, if you access a web URL of a web service (for example REST) you are getting simply the data or resource in whatever format the service brings. It’s up to another application (a client) to transform the data and make use of it. Imagine going to Google.com/user/krisviceral and you simply get a string saying “name:Kris last name: Viceral”. Always-on as the name implies is always running. You don’t fire up a service just when you need it (ala traditional desktop application).

Note: Service refers to the web service. Client refers to the consumer of the web service. 

Service-Oriented-Architecture (SOA)

Web services are part of the design/architecture pattern called SOA that focuses on making resources accessible through (again) services. SOA handles discoverability of different services and their interaction to each other. Services under SOA are built to be unassociated and loosely coupled. This will allow you to build a complete web application by combining/integrating several of these services.

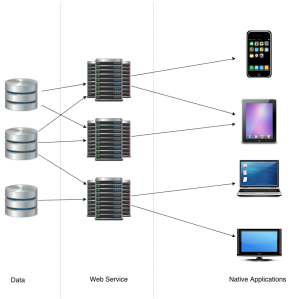
WS Example Flow. Click to enlarge.

Example Web Service and Client: Twitter

If you want to build your own Twitter application you can build it through calls through Twitter’s web service API. After you’ve built the initial UI, you can load the timeline tweets by calling their REST API by doing a “GET” call. What you’ll get is a series of objects (tweets) in JSON. A tweet object would contain the user, the tweet itself (140 chars), date and time and so on. Now since you now have the data, it’s your choice on how your application will read this and show it in the UI. The same thing goes for posting a new tweet. You send an object containing the needed to the API and it’ll take care of the rest.

Web services that are APIs are like exactly like calling a regular API except that you are doing it consuming and interacting with it through the web instead of importing a class or file in your application.

ws

Web Services Diagram. Close enough. Click to enlarge

Advantages and Disadvantages of Web Services

For me, the 2 biggest benefits of designing an application through web services-client are platform-independence and maintainability. Building a web service first would make it easier as a developer to make your content reach different platforms. Essentially, since the generic processes and data is separate, all you need to do is to build a “view” in the native platform. Once you’ve build the service, you can reuse it on as many different platforms as you want. In this day and age of having a smartphone, computer and more, that benefit would be pretty nice to have. Another benefit is maintainability. Since the service is separate from the client, this makes it easier to maintain. If you make an update to the native application or web service client, you don’t need to touch the service at all. On the service end, if you want to make improvements to make it faster to read or process data the client doesn’t need an update to take advantage.

What are the disadvantages then?  I’ve only worked with web services and I’ve only used REST for a short time, so I haven’t really seen all or most of the roadblocks yet. For me the biggest roadblock and  the difficulty lies in remembering that it is different architecturally from a standard web mvc application. The languages you are using may be the same but the style you are building it is different. Security on a web application is different from the security you will place in your web service. Remember that you don’t have a front-end so you’ll use different things for authentication and authorization. On the testing side, you are testing the service differently from the client web application. In a web service, you are checking if the data you are producing is correct when it arrives to the client. You are also testing the consumption of data and handle incorrect parameters, data, etc. Building the web service is again more like building an API.

Does creating a web service make everything more complex? Yes. For me, it’s not too complex that it makes it seem like a herculean effort to pull off. Implement a web service using REST is not too hard. Plus, it’s fun to learn.

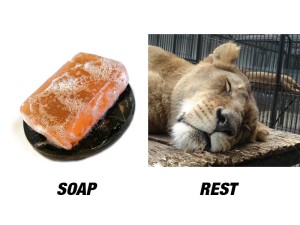
More funky acronyms: SOAP and REST.

More funky acronyms: SOAP and REST.

Types of Web Services Implementation

There are two types of popular implementations of web services namely SOAP and REST. SOAP stands for Structural Oriented Amnesia Pepper… okay so maybe not. It’s actually Simple Object Access Protocol. Web services can be implemented through the SOAP protocol which transfers messages through the HTTP or SMTP protocol and uses XML as its message.  SOAP itself looks like a beast with tons of things you need to understand to be able to implement. I have not worked with SOAP yet so I’ll stick with discussing REST.


REST, Something Nice To Do Right Now

REpresentation State Transfer or REST for short, is an architecture style for creating distributed systems. Why style? REST is not a protocol (it would be called RESTP if it was) nor a standard. Let’s discuss all the things about REST one by one.

Client-Server, Resources and HTTP Methods

As in the example above, there consists a client and a server (providing the service). They communicate through the HTTP methods primarily the GET, POST, PUT  and DELETE. They access “resources” on the server. In REST, everything is a resource. Not just photos, videos and files but even objects representing data is a “resource”. Think of it as being able to  access domain objects but by calling a service instead of directly creating it in your code.

If you don’t happen to know, a domain object is a plain-old-java-object (POJO, had enough acronyms yet?) that is used to represent data in the database. For example, you’ll have a USER object that contains String name, Int userId, String email, etc. In a standard web application, you would have a technology/tool called ORM so that your object will be created almost automagically using the different tables in your database.

Again, in a web service, you are calling the object though the service. You can get it through a variety of media types. Depending on the server, you can grab resources through JSON, XML, Plain ol’ HTTP Text and more.

To Be Continued…

On the next part of the series, I’ll dive in deeper to REST by discussing  JAX-RS (the java implementation of REST) along with the frameworks for building REST with Java, namely Spring and Jersey.

Insights: Interview with Patrick Wyatt, co-founder of ArenaNet, former VP of R and D at Blizzard

As a “rookie” developer, I love to read about software development. I’m always interested in seeing what it takes to ship products I love to use everyday (hopefully be able to be part of shipping one too!). Of course, I also like learning about game development wherein software, art and entertainment are combined together . A group of very talented people take on a 3+ year journey to ship quality entertainment that delivers excellent narrative and fun gameplay.

Anyway, while reading one of the articles on software development, I saw an inspirational quote from one of the developers of Star Wars: Knights of the Old Republic and I wanted to post it. I was reading a separate article about the development of StarCraft and I got the two people mixed up. That misattribution gave me a chance to talk to one of the people who created StarCraft, Patrick Wyatt. Patrick is the co-founder of ArenaNet (GuildWars) and was a former employee at Blizzard who was part of the team that shipped some of the most iconic games like the WarCraft I and II, StarCraft and Diablo.

I got to ask him a couple of questions about the game industry and more. You can find the “small” interview below.

 Q: You’re part of a lot of critically acclaimed games. From all the games that you have worked on, what game are you most proud of and why?

Pat: I’m proud of each game I’ve helped to create so it’s a tough choice to choose just one. That being said, I think Guild Wars makes me most proud because of what our small team managed to accomplish.

We set out to build a company from nothing and develop an innovative game, and to do so without killing ourselves with a crushing development process. And we were successful!

At ArenaNet we hired a lot of folks just out of school so some of them were not aware of how much different the development process for Guild Wars was compared to “traditional” game development. I’m glad they didn’t have to suffer the awfulness of years-long crunching that seems to be so common in the industry.

Trivia: When Guild Wars first came out, they we're one of the only commercially developed Massively Multiplayer Online Role Playing Games (MMORPG) to ditch the subscription model (paying $/month to play). Buying the game allowed you to play without a limit.

Q: What are some of your favorite games for the last 2-3 years?

Pat: I’ve enjoyed playing DayZ (video below), a zombie survival game. I’m actually surprised I like it because the game is so hard core. Crawling across a field for ten minutes doesn’t sound like fun, but in the context of the game it can be! I’ve played some League of Legends and enjoyed the competitive aspect. Kingdom Rush (iPhone/iPad), which is very clearly inspired by Warcraft and StarCraft, is a lot of fun to play, and my kids dig it too. And recently I discovered AirMech, which is a blast.

Q: What do you think are the biggest innovations in gaming in the last 5 years?

Pat: Without a doubt the adoption of the free-to-play business model in Western markets is huge — it’s changing the way that games are created. It has focused designers on creating experiences that are immediately engaging and long-term sticky. The down side is that some designers have focused on creating manipulative products that make money more for their inventiveness in using addictive or shady “dark patterns” than for their fun. My feeling is that the majority of players will develop greater resistance to these dark patterns over time, so I hope we’ll see fewer games where psychological manipulation is the norm.

The other major innovation is mobile gaming. The ability to create fun, small-budget games is great! I find that I play mobile games much more these days than I play traditional sit-down (PC/console) games. I look forward to more and better games as designers become better at utilizing the strengths of these small form-factor devices.

Q: As part of my thesis in university, I did some research on the progress of AI in games. I noticed AI hasn’t improved as fast as graphics and game engines have.  What do you think is an area in games that has not progressed rapidly?

Pat: AI is still a hard problem to get right, and will likely continue to be so for a long time. In Guild Wars 1 we actually had to detune the computer-controlled
NPC “hero” characters that join the player’s party. They were so good at fighting that, when the human player died, they’d go right on fighting, win the battle, and resurrect the player, making the human player feel unnecessary!

There are “middleware” offerings for rendering graphics, playing sound/music, creating artwork, controlling physics, performing analytics, and many more. I think the area that’s seen the least growth is the development of server backends that can be used as the basis for large-scale online worlds. They’re expensive to build so few companies can afford to create them. It would be awesome if there were more choices. As much as I like writing code, it would be nice to use someone else’s fully-debugged, highly-scalable MMO game-engine for a change!

Q: GuildWars has an interesting business model for a massively multiplayer RPG, where you don’t need to pay a monthly subscription. In regards to business models, what is your opinion on Free-to-Play?

Pat: Looking back, I wish we had forseen the rise of the free-to-play business model and shipped Guild Wars using that method. The pay-once model we used for Guild Wars, along with extending the game by releasing multiple campaigns, turned out not to be as successful as we hoped. Guild Wars 1 did well but I don’t think the design decisions we were forced into making due to the “release a campaign every year” business model were ideal.

Free-to-play is great for gamers because they can try a game before paying for it. This immediately separates out quality games from games that are crapware like most movie-license games. While other business models aren’t dead, game developers need a compelling reason to utilize other business models than free-to-play.

One of the many great Dota loading screens

One of the many great loading screens from Dota, one of the most famous MOBA games.

Q: It seemed like back then great RTS games came one after the other from Blizzard games to Westwood’s Command and Conquer, etc. What do you think of the current state of RTS games?

Pat: I think that the RTS genre has been eclipsed by MOBA and tower-defense games, many of which — like League of Legends, Kingdom Rush and AirMech, for example — are RTS game engines in disguise. There’s still a big market for RTS games, as evidenced by the success of StarCraft 2, but I think the offshoots are more fun. For my part I’m really tired of RTS base-building — too much energy directed towards economics and not enough on combat!

Q: Now that gaming as a hobby is more mainstream, how much has this affected game development?

Pat: For starters the game market is bigger and more diverse. Because there are so many more game-players the industry can support PC, web-browser, facebook, console, mobile, and tablet as platforms, and each of those platforms can support many game developers. And further, games get more attention in the media (both positive and negative), which means that more folks are getting clued in to the opportunities for enjoyment and employment. As the industry grows I hope we’ll see more ideas around making creative games where players dictate how the game should be played. Minecraft is a great example, in that it allows players to decide what the game’s objectives should be.

Trivia: Besides mobile gaming, this year also seems to be a big one for the evolution of the game industry. Several "game" hardware will be released such as the Oculus Rift, a virtual-reality headset, Ouya, an Android-based $99 console and the "Steambox", Valve's initiative to bring the PC to the living room. Very exciting stuff!

Q: Our team is called Leadership Development Program (LDP). We’re batches of new IT graduates being trained both in technical and leadership skills. Do you have any tips in terms of general software development?

Pat: The biggest challenge in software development is getting a project done when the project scope is larger than what a person can keep in their head. When a project large the communication overhead goes up exponentially with team size due to interconnectedness between components being built. Decoupling the components is a great place to start, but only goes so far.

Some leaders try to conquer the problem by writing massive design documents in the hope that they can specify every aspect of the design and answer every question. With such a solution it would seem that outsourcing the development ought to be easy!

I think a great solution to the problem is to delegate responsibility, and more importantly, authority, among the team members so that it’s possible for them to define and achieve goals on their own. It takes more training, and certainly more trust in the team, but motivates the developers because their destiny is in their own hands.

Kris: I would like to thank Patrick for his time in sharing his insights into the industry. It was a great read!

Create your own local repository and solve yum related problems

YUM is a great tool that makes installing things in linux so clean and easy. Unfortunately, it requires an internet connection which for some specific scenarios might not be available. This tutorial is a lifesaver in that regard. Download all the RPMs (or something close to an installer file in Windows) and put set yum to look for those files within the same computer. Done!

A techie's confessions

In RHEL 5.0 onwards Red hat introduced YUM concept by which it is very easy to install some rpm without being getting worry about the dependency problem.YUM takes care of this dependency problem by selecting all dependent RPM to install from a central repository either from RED HAT or from some third party repository like oracle has or you can create your own repository if you want to use YUM offline

YUM: – Yellowdog Updater, Modified (YUM)

In first section we will discuss how to create your own local repository.

1. To create that inserts your Red hat DVD installer inside DVD ROM.

2. Mount the DVD by

[root@localhost ~]#mounts /dev/cdrom /media

3. Create a folder of your choice. In my case I have created /home/rpms

4. Copy all the RPM from /media/Server/ to /hom/rpms folder

[root@localhost ~]#mkdir /home/rpms
[root@localhost ~]#cp -rv /media/Server/*  /home/rpms

6. Now look for…

View original post 443 more words

Next Parts of the Guide and Future Topics

I have a lot of stuff coming up right now so I might not be able to make the next part of the tutorials. The good thing though is that I was playing around with a couple of applications and found some designs that would work better than what I made. I would probably redesign the ugly mockup I made.

Next Tutorials: Database

For the next of tutorials on the application, I plan to write the database and a script. From an XML file, it will get the questions and insert it (if it’s new) into the database. This would be great in the sense that I could just play around with a string array in the XML file to easily modify the contents of the question database. It’s probably not the best solution for bigger projects but this isn’t exactly one. Big projects or games such as scrabble would probably have a dictionary (db) already set and ready to use. Anyway, the parts of the tutorial would include the connection to the database and the script for transforming the array into database entries. The transformation from array to database entry should include some ways to save data. Some ways to save data would be to use an integer or byte for who what when how but that will be discussed and thought out better when I write it.

Running a Thread

Normally, a simple project like this wouldn’t need one but for the purposes of the “timing” mechanism it’s best to run a thread. In the thread, it would check how much time is remaining. If a question is answered then the question checking is applied, points are given and time restarts in the next question.

 Other ideas for the application

I haven’t had the time to think some of these ideas through but as the screenshot shows I would like to add an avatar. This would use the Camera API and also cover writing data. I don’t know if I’ve written this before but it would be a cool mechanic to have some “abilities” you could use in the game. Things like stopping time, removing one of the wrong answers (think who wants to be a millionaire type) would be nice to have and some of it wouldn’t be too hard to implement once you design it well.

 Topics: Downloadable Content (DLC) is it Worth the Money as a Customer

DLC has now been around for 5 years (for consoles). DLC is content that expands games by adding levels, costumes, weapons, etc. There was a huge backlash when it first arrived but the issue has died down a bit until the recent release of the big blockbuster game Mass Effect 3. There are questions as to whether DLC is a good thing as a consumer because some companies are not “expanding” the game but rather planning it even in the initial stages. As a customer, it’s great to be able to invest in something you like more but there’s a line between “hiding” parts of the games through a payment and expanding content. Anyway. I want to research about the history of DLC, where it came from (expansion packs from the 90s?) and see if it’s successful.

Emergence of new Genres, Ideas, Community and Business from Mobile

It’s no secret that both Android and Apple have seen tremendous growth. The biggest reason for the explosion is applications. Because interaction and use cases with mobile devices is vastly different from desktop environments, it has spawned a lot of interesting things. Instagram is a very good example. Dropbox became even more useful because of mobile devices. In games, new genres such as “running” games have emerged. I would also like to research about this and find out all the new things mobile has brought.

AMS Part 5: Programming Buttons and The New Activity

A screen mockup. Lacking artistic touch.

Check out the other parts here, description, status and source code hereClick on an image to enlarge (or use this Chrome Extension to hover zoom).

In this part of the tutorial, we’ll create a simple structure for the actions on a button. We’ll start an empty UI window that we’ll later use for the game. This might be relatively short as it’s pretty simple stuff. I still haven’t setup code view so this will still be in print screen mode. (On the plus side, you get to write and understand everything right?)

Our current code.

package com.krisviceral;
import android.app.Activity;
public class AMS extends Activity{
private String TAG = "AMS";
@Override
public void onCreate(Bundle savedInstanceState){
super.onCreate(SavedInstanceState);
setContentView(R.layout.main);
Log.i(TAG, "The main activity has started");
}
}

Note: The sourcecode added was “glued-in” to the post to make it more convenient. The code posted in the notepad-looking extension was not tested. Double check with the image as it’s the original one.

Tasks

Above we see our current code. The tasks for this tutorial would be to initialize the buttons, create listeners and start a new blank window. Let’s start with initializing buttons.

Referencing Buttons

The great thing about building the UI from the XML is that we don’t need to customize the look and feel anymore and using it in code is fairly simple. Instead of declaring a new button we just refer to it with Androids R. Android R allows you to access XML elements such as string values, drawable images, buttons among other things.

To declare a button, you use the above code. The button has is a view object. The findViewByID means that we’ll find the object that was created in XML. The R.id is a reference to the ID property of an XML object. Where did play_btn come from?

From the XML code view of the main UI.

Some XML objects has a property called ID. We use this ID to reference it in our actual code. Open your main UI XML (main.xml in this case) and look at the XML button code. You’ll find each button’s ID there. I already have mine named. If you haven’t, feel free to name them appropriately.

Repeat this step for the rest of your buttons and you should have something like the code below.

HighScore and stats might be redundant but it’s easy to take out later.

Listeners

Now that we have our buttons present, it’s time to go and make them do something. We need to declare some listeners to handle the buttons code. To do this we’ll implement OnClickListener to our Activity. As with implementing, you have to do a couple of steps before being able to use it.

First, add the “implements OnClickListener” to your class. Next, Import android.view.View.OnClickListener. Lastly, create the method onClick (public void onClick(View arg0).

If you’re using Eclipse, it’s much easier to do everything above in 2-3 clicks. First add the implements OnClickListener (note the capital O). Then click the “x” on the near the line numbers. On the window that will pop-up under the OnClickListener select import ‘OnclickListener’. Click the “x” notification again to automatically add the unimplemented methods. Quick and easy. See images above.

Your current code should now be something like the one below.

Let’s set the listener to each button. Simply set the listener to “this” or our current class since we already implemented the OnClickListener interface. See below for code.

Note:Check right below for the combined code

TODO code

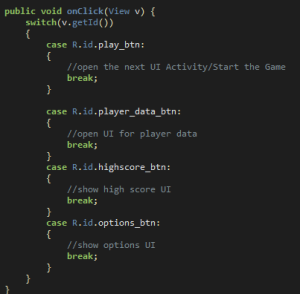
Now, there are a lot of different ways to implement the TODO code. I happen to like the structure I’ll show below since it’s similar to the structure I used on my older java programs. This structure involves using the switch statement though unlike the action listener/action performed of Swing. How can switch be used when we’re dealing with events? Switch can be used in this case because we’ll use the getID method returns a particular integer value for each object. In a sense we’ll just be checking which button is pressed with respect to it’s ID/integer value. In each of the case, we’ll put the TODO code for each button.

Make a switch statement and for the parameter

Change the format/coding style to one you prefer.
package com.krisviceral;

import android.app.Activity;
import android.content.Intent;
import android.os.Bundle;
import android.util.Log;
import android.view.View;
import android.view.View.OnClickListener;

public class AMS extends Activity implements OnClickListener{
private String TAG = "AMS";

@Override
public void onCreate(Bundle savedInstanceState) {
super.onCreate(savedInstanceState);
setContentView(R.layout.main);

Log.i(TAG, "The main activity has started");

View playButton = findViewById(R.id.play_btn);
playButton.setOnClickListener(this);
View statsButton = findViewById(R.id.player_data_btn);
statsButton.setOnClickListener(this);
View highscoreButton = findViewById(R.id.highscore_btn);
highscoreButton.setOnClickListener(this);
View optionsButton = findViewById(R.id.options_btn);
optionsButton.setOnClickListener(this);

}

public void onClick(View v) {
  switch(v.getId())
  {
     case R.id.play_btn:
     {
      //open the next UI Activity/Start the Game
     }
     case R.id.player_data_btn:
     {
      //open UI for player data
      break;
     }
     case R.id.highscore_btn:
     {
     //show high score UI
     break;
     }
     case R.id.options_btn:
     {
     //show options UI
     break;
     }
  }
}

}

We’re almost done. The last thing we’ll tackle is opening a new window. It’s not as simply as you might think because after we declare a new UI class we also need to declare it in the manifest.

First create a blank window. In the res/layout right click and select new Android XML file. Name it game. Let’s create a new java class and name it Game.java.

The New Activity/UI Window

The Game java file is similar to our AMS/main java class. It’s an activity too. We import Bundle, Activity, View and Log as well. We’ll add a String TAG for easy debugging and also use our game.xml for the layout.
Also, add the log.i method to help us debug stuff later on. Again, this is almost the exact copy of what we started with in our main java class. The code for the Game.java is below.

Next, let’s declare it in the manifest. See the red highlighted area in the image below.

<activity
    android:".Game"
    android:theme="@android:style/Theme.NoTitleBar.FullScreen">
</activity>

Note: Code above is just the snippet. Insert it below the last activity tag in your manifest

To add our new activity, use the activity tag and place it after the last activity tag (of the main activity). There are a couple of properties you can add but I wanted to go full screen so the label property is actually not used and we won’t add that in the new activity declaration. The name format as you notice is “.ClassName”. We also set it to fullscreen for full awesomeness.

Opening the Window

Just a little more! Now that we have the new UI window setup and declared we’ll add the code to open it but intent has to be explained.

Intent?

Intent is widely used in Android. A simple explanation would be that to open a new window, use another program or similar you would use an intent object. It is an object with information and a class (or action) attached. For a more detailed description the Google dev guide is here or if you prefer the documentation and a good tutorial is found here.

For this tutorial, let’s use the intent to open the blank window we created. In your, switch statement for your button create a new intent. Intent i = new Intent(this, Game.class). Then add the method startActivity(i). (Don’t forget to import! android.content.Intent).

case R.id.play_btn:
{
  //open the next UI Activity/Start the Game
  Intent i = new Intent(this, Game.class);
  startActivity(i);
  break;
}

It works!

Hopefully it does for you. You can download the code here.

Future Posts

This post also took longer than expected just because I had a hard time deciding on the layout and look of the Game interface. I might dive into a few topics like SQLite, running a thread, etc first before going to the building the UI again. I’ll probably take a break too and finally finish a couple of articles on the gaming or tech industry that I wanted to talk about.

AMS Part 4: Placing and Customizing Buttons

Now with buttons.

Check out the other parts here, description, status and source code hereClick on an image to enlarge (or use this Chrome Extension to hover zoom).

First, I have to say that before making this tutorial I was a little confused on how to customize buttons. I read a couple of tutorials which can be found here and here. I will use most of the code from the 2nd link but will explain it using the 1st link.

So Many Choices

There are actually a lot of different ways to perform customization on buttons. You could create images which will be used as the background (Android ImageButton or ninepatch) or mess around with the built in properties of a button. As far as I know, you could perform both either through java code or XML. The one I’ll discuss in this tutorial involves using XML. It’s pretty easy to change the look and feel once you have everything setup.

Understanding Button States

If you’re familiar with using Swing in Java (or an equivalent) then you can skip this part. Before you place and customize buttons, you have to understand its states. If you look carefully at any button on almost any program, you can see that it changes its look depending on what you’re doing with it. Some of the common states of buttons include hover, pressed, selected, enabled or disabled and normal/default. For this tutorial, let’s worry about only pressed and normal because… well because I’m using a touch device. States like hover are more useful with physical buttons or a mouse pointer.

Update: Placed the sample image above. It’s the 0 button from MS calculator. Default, hover and pressed states are shown.

Place a Button

To place a button, simply drag the icon from the palette form widgets panel from the left to the canvas or UI in the middle.  Drag the icon below the ImageView or the space provided for your logo.

You get a boring button as a result.

Button Properties

If you have the property windows setup in your environment, you’ll notice all the things you can modify. If you check out the code, you’ll notice something like below.

Auto-generated button code.
<Button
   android:id="@+id/button1"
   android:layout_width="wrap_content"
   android:layout_height="wrap_content"
   android:text="@button"/>
Note: The sourcecode added was “glued-in” to the post to make it more convenient. The code posted in the notepad-looking extension was not tested. Double check with the image as it’s the original one.

These are the most basic properties of a button. The “id” is used to reference the button in your program code (more on this later). Layout as you might expect is used to adjust the size of the button. Besides an actual pixel value, there are 3 values you can place to automatically adjust the size of the button.

The value “wrap_content” means that the object will adjust depending on the value of another item. In this case, the width of the button is adjusted depending on the length of the string or button label. On the other hand, the value “fill_parent” means it will fill up the space allotted for the button. The value “match_parent” means it will match the size allocated for the parent object. Most of the time I just use wrap and fill.

Wrap_content (above) vs fill_parent.

The last property from the auto-generated code is “text”. The value you put will be the label of the button. It’s better to put the value in the strings XML file. To do this, first place a value in the res/strings.xml file. I prefer placing values in code view. To insert a value simply VALUE (without the spaces). To finish it, go back to your button properties and in the text property use @string/value. See images below for a sample. The @ operator means it will access a file or folder.

Sample of strings XML file. Disregard other values for now.
Accessing the string value in the button code. Results below.
Yes you are a button.
<?xml version="1.0" encoding="utf-8"?>
<resources>

<string name="button_label">I\'m a button</string>
 <string name="app_name">AMS</string>
 <string name="play_label">Play</string>
 <string name="player_data_label">Stats</string>
 <string name="highscore_label">Highscore</string>
 <string name="options_label">Options</string>

</resources>
<Button
   android:id="@+id/button1"
   android:layout_width="wrap_content"
   android:layout_height="wrap_content"
   android:text="@string/button_label"/>

Customizing Buttons

Now we’ll start changing the default look. Credit goes to the tutorial here because I played around with that the author provided.

First let’s setup the requirements. Create the files colors.xml and styles.xml in the res/values folder. Right click and select new > Android XML. Just put “colors” and “styles” in the dialog. You’ll see that it’s a resource type and is similar to how we use the strings.xml.

Notice it’s a resource type.

Placing Color Values

We’ll place some values in the colors.xml to make the code easier to reuse. Colors in android are in the form #argb, #rgb, #rrggbb or #aarrggbb. What vodoo do I speak of? Simply A is alpha, R is red, G is green and B is blue. RGB values are used to represent colors. ARGB is the same but with an alpha value. The alpha is the transparency. RGB values create colors. A combination of intensity of the 3 will produce a certain color.

If you’ve used Photoshop (or similar), tried any form of web design then you’re already familiar with it. If you would like to see color values try Color Picker to get the hex RGB codes (see image below). For this tutorial

The color picker site. You can auto-generate colors too.

I’ll be using shades of blue similar to the logo colors. Take note of the color values as we’ll put it in code. If you’re not familiar with a gradient then it’s a combination of two colors or actually.

Blue Base: #449def
Blue Stroke: #2F6699
Gradient Start: #00a2e2
Gradient End: #0767a4

To insert these values go to colors.xml. the format is VALUE . Remove spaces. Plug in the name then the value. Notice it’s similar to how you add strings.

You can choose a different naming scheme if you like.
<color name="blue_base">#449def</color>
<color name="blue_stroke">#2F6699</color>
<color name="blue_gradientS">#00a2e2</color>
<color name="blue_gradientE">#0767a4</color>

Creating the Button Look and Feel

Now that we have the colors to use, let’s start styling them’ buttons. Create a folder called “drawable” under the res folder. Right click that folder and select new XML file and name it “blue_menu_btn” under the choices select selector. See images below.

Choose selector as the root element.

What is a selector?

Based on my understanding(which could be technically wrong), you can use the selector item to define what happens in each state of a button. You can browse the tutorial code for where I got this from here. Anyway, each item is a state of button and Android reads it based on what is on top. The item on top will be read first the next one below and so on.

I’ll show the code below and then start to explain what each one means. Full project is available at the link in the last part.

<?xml version="1.0" encoding="utf-8"?>
<selector xmlns:android="http://schemas.android.com/apk/res/android" >
<item android:state_pressed="true">
<shape>
<solid
android:color="@color/blue_base"/>
<stroke
android:width="1dip"
android:color="@color/blue_stroke" />
<corners
android:radius="3dip"/>
<padding
android:left="40dip"
android:right="40dip"/>
</shape>
</item>
<item>
<shape>
<gradient
android:startColor="@color/blue_gradientS"
android:endColor="@color/blue_gradientE"
android:angle="270"/>
<stroke
android:width="1dip"
android:color="@color/blue_stroke"/>
<corners
android:radius="3dip"/>
<padding
android:left="40dip"
android:right="40dip"/>
</shape>
</item>
</selector>

The selector tag is automatically inserted when you selected it on creation. The item tag represents a specific state of a button. Like I explained in button states, since I’m using a fully touch based device I am only concerned with the state_pressed.

The first item is for the state pressed and Android will interpret it first. This is because the line state_pressed is a condition. If it isn’t pressed then it will go to the next item which is the non-pressed state. Shape means that we’ll draw it manually instead of referring a picture for the button. In item, solid means that the button would be using a solid color (one color) as the background. We refer to the blue_base color value in the colors.xml (using the @ operator). Stroke is a line that goes outside the button. The width is how thick the stroke would be and again the color is the one we defined earlier on. Corners represent how circular/rounded the end of each button is. Finally, padding is how much space to give on each side (how much space the text labels can use).

(If you’re familiar with Photoshop blending options then it is the same concept as the Stroke option there.)

The next item tag is the normal or unpressed state of the button. This will be what the button normally looks like. It’s quite similar to the previous one if you notice except for the gradient. What this means is that instead of using one solid color, we’ll use a transition of 2 colors. For the colors, we refer to our previous values in the colors.xml file (See how easy it would be to change the theme?). Angle is what angle the colors would transition from. If you modify the value then it can go from top down or left to right.

Below is an explanation to the button’s look.

1. Stroke 2. Gradient Start. 3. Gradient End (Disregard font style, it’ll be below.)

Using the Button Style

Now that we’ve set everything up, let’s use it. Go to your code view in Main.xml (Where the button xml code is located). Ready? Simply add android:background=”@drawable/blue_menu_btn” below the id tag. See images below.

The button with our color style. Still needs fixing.

Setting up styles

To fix the button we’ll be setting up a style. What are styles? Styles are a saved set of properties. We’ll be saving things like layout sizes, text colors, etc. We can import this to each of our buttons to have the same look for each one and save a lot of time.

Copy the code below in your styles.xml file.

I will add/use syntax highlighter soon because images are just not great to use for code obviously.
<?xml version="1.0" encoding="utf-8"?>
<resources>

 <style name="main_menu">
 <item name="android:layout_width">fill_parent</item>
 <item name="android:layout_height">55dip</item>
 <item name="android:textColor">@color/menu_text_color</item>
 <item name="android:gravity">center</item>
 <item name="android:layout_marginLeft">45dip</item>
 <item name="android:layout_marginRight">45dip</item>
 <item name="android:textSize">30sp</item>
 <item name="android:textStyle">bold</item>
 <item name="android:shadowColor">@color/menu_shadow_color</item>
 <item name="android:shadowDx">1</item>
 <item name="android:shadowDy">1</item>
 <item name="android:shadowRadius">4</item>
 </style>
</resources>

Note: Hey I finally added syntax highlighter! Hooray!

Almost all of the code is self explanatory. The name is the name of the style and will be used in importing/referencing/using it. I used layout height of 55 dip because that seems to be a better fit. (Dip is density independent pixel).You can change any of the values to suit your liking. We use the color values we prepared before.

Again, credit goes to the tutorial here because I learned it from that post.
We use the style by adding style=”@drawable/blue_menu_btn” in the button properties. Results below.

The result.

So there we now have the cooler looking button. It’s much better than the default one. You have to fix the label because it’s too long.

Finishing Up
Add a couple of more buttons and text labels in the strings.xml and you can come up with something similar to the code below.

Note: See below for the final code on the button styles.

You might notice the layout margin top property. I added it to leave a little space on top of each button. The first button has the most space because it would be too close to the logo. I didn’t add it in the style because each one varies (almost). I added values to the

It results to the screenshot below.

If you look carefully, the shadow is not rendered/shown in the main.xml graphical layout image representation mechanism thingamajig. I don’t know why but the shadow is present when I run it in my phone. I haven’t solved that yet.

Update: Making things easier
I reached out to Mr. Folkert Jongbloed, author of the tutorial I posted, and he gave a great tip. You can use the parent/child feature to make it easier to customize objects. With our code, we already setup the main_menu button style. I had 2 variations playing around with the marginTop attribute. There is another way to do this.

We go to the styles.xml and create a new style. See below.

If you notice, we’re inheriting all the attributes of the main_menu style we defined. We use the “parent” then add the objects name. When you go into your button code all you have to do is insert the new style.
style =”@style/menu_btn_top”

Note: The final main.xml in the layout is below

<?xml version="1.0" encoding="utf-8"?>
<LinearLayout xmlns:android="http://schemas.android.com/apk/res/android"
 android:layout_width="fill_parent"
 android:layout_height="fill_parent"
 android:orientation="vertical"
 android:background="@drawable/background">

<ImageView
 android:id="@+id/logo_imgView"
 android:layout_width="wrap_content"
 android:layout_height="wrap_content"
 android:src="@drawable/logo2"
 android:layout_marginTop="50dip"/>

<Button
 android:id="@+id/play_btn"
 android:background="@drawable/blue_menu_btn"
 style="@style/main_menu_btnTop"
 android:text="@string/play_label"/>

 <Button
 android:id="@+id/player_data_btn"
 android:background="@drawable/blue_menu_btn"
 style="@style/main_menu_btnNormal"
 android:text="@string/player_data_label"/>

<Button
 android:id="@+id/highscore_btn"
 android:background="@drawable/blue_menu_btn"
 style="@style/main_menu_btnNormal"
 android:text="@string/highscore_label"/>

 <Button
 android:id="@+id/options_btn"
 android:background="@drawable/blue_menu_btn"
 style="@style/main_menu_btnNormal"
 android:text="@string/options_label"/>
</LinearLayout>

This is really useful if you’re creating different states and makes things even more reusable (awesome!). I’ll update the code soon when hopefully by the middle of the week and perform a couple of more experiments.

Thanks for the tip!

Source Code
You can download part 4 source code here (now updated).

What’s next
On the next part we’ll implement the buttons in the code and have it do something.

A Couple of Ideas

Ideas. From sxc.hu

I’m still working on the ever continuing Android tutorials but I thought I’d write something different right now. I wanted to write down a couple of ideas I had on future projects I would take on (more below).

Why am I sharing my ideas?

In a world where information can easily spread, one would wonder why you would want to share your idea or concept. Why would you want to share something brilliant you came up with? For me, ideas are useless. It remains in your head unless you execute upon it. It doesn’t help anyone until you make something out of it.

My friend Karl has a good article pondering on it in his blog DaftCoder. There are also insightful comments by others. (I’m the “ghost” commenter).

Some interesting ideas on projects

With that said, I wanted to share my ideas. There are probably similar stuff already out there but I wanted to do it personally. I want to learn some interesting topics in these projects. Most of the ideas aren’t fleshed out. There are no mock-ups, designs or tests yet. Simply they are ideas in my head.

(Game) Pinoy Henyo (Philippine Genius?)

Popularized by the longest running show in the Philippines (Eat Bulaga), Pinoy Henyo is a game show wherein a pair of contestants try to guess a word. One person has the word on his head and tries to guess it by asking questions answerable by only yes, no and maybe. The other person simply answers with yes, no or maybe.

There was already an Android app that was created out of this (non-official). It’s been taken down from the market understandably due to copyright concerns. There’s a “renamed” or alternate version out.

Topics/Features or Why: Obviously, I won’t actually do the exact same thing as I don’t want to be associated with it nor do I want to damage the brand. I actually thought it would be cool to have something similar but with multiplayer.

It would be great to play this with other people remotely (think Skype games). These are some of the ideas I randomly came up with. Using the camera API to generate avatars. Multiplayer over wifi and bluetooth. The host of the show comments while both players are playing. Game modes would be chat or video.

Links: Official site of the segment.

Ultimate Trivia Game

This came up while I was working on the tutorial. I would want it to evolve into a trivia game. I think trivia games are cool although not as exciting as other forms of word games. Why Ultimate? Well, that sounds great. I could still work on ideas to transform the game into something a lot more fun but still simple.

I realized I could add a lot of interesting features. Some features like the leader board would be great in terms of learning how to implement it/create my own instead of using something like OpenFeint.

Features: Categories for questions, Avatar creation using camera, multiplayer “versus” mode, algorithm for not repeating questions, leader board

Update: I just had an idea. Why not incorporate other genre elements into this game? How about adding RPG elements like “leveling up” or having abilities (Freezing time, adding time, disrupting an opponent in versus mode?)


(Game) Wheel of Misfortune

No, not a clone of wheel of fortune but rather more of a tech demo in a way. Once avatars are created (notice I had a ton of ideas when I thought about avatar creations) you spin a wheel and a torture of sorts would happen to your in-game character.  This is not brutal gory actions but more similar to something out of a cartoon. I got inspired by Little Big Planet’s initial vision for sackboy animations. This would be interesting to put on top of a game.

Also, see video above on 1:35 and 1:40 for examples.

Source.

(Communication) Themeable and Encrypted Messenger

This idea came out of a need. The theming functionality is because the plain SMS messenger on Android (Gingerbread) can’t be customized to have a “black on white” theme. Why black on white? White is too bright when you’re texting in a dark room (a room in midnight for example) but white is useful for outdoors or most general purpose texting.

It would be great to have a black and white themes be able to easily switch back and forth similar to the Any.do Todo application in Android.

The encryption is something interesting. As with more and more news coming out that private information can easily be hacked or obtained, there would be a need to add encryption to make sure you keep your privacy. I realize this is a tall task of course as encryption is a whole huge topic in itself. I plan to add something simple like adding a user “lock/pin/password” that would be used as a key to be able to read messages. It could even be extended to have custom passwords for certain contacts (woah james bond?) but that would leave it with it’s own headache of remembering passwords.

The encryption came out of a previous idea of making my own password manager. You already keep tons of usernames and passwords for different services and it’s hard to keep up. Solutions like 1password, lastpass and keepass exist to help you out. Why not make your own? You could leave out features you don’t use. You could put your own spin, etc, etc. Of course most of the established solutions are already really advanced and useful if you don’t want to mess around with code.

Source.

(Modding) Automated Light Adjustment

This idea is something out of the ordinary for me. I don’t usually have an interest with modding hardware or similar. This is actually a solution I want to build for my room. My room is far from window so I don’t have the advantage of the regular sunlight schedule (bright in the day, dark in the night).

I’ve heard about the Adruino board before. It’s an open-source customizable platform for electronics. In terms of functionality it’s very simple, I have a couple of LED lights that turn on depending on the time of day simulating day-time. More lights turn on depending on the time of day. More advanced features would be maybe something like if it detects you’re nearby (using a phone perhaps or using a remote application) it would automatically turn on and off (save on energy too).

This is a really tall task and would involve a lot of reading and messing around. I don’t know yet if it’s entirely possible or if I have the time to work on it. I haven’t done anything similar in the past. I’ll have to put more research before I dive in.

Links: Adruino Home Page, Canadian Store for parts, Android page on Adruino, not entirely sure

Final Thoughts

Those were a lot. Again, most of them are in the “I thought of something interesting” phase and may or may not be worked on for a lot of reasons. Those ideas could also be transformed into something different. If there was already similar projects, I’ll update this post if I have the chance to try them.